

Info On Fermenting from The NCHFP
Brussel Sprouts with a smokey twist
Escabeche (See Below)
Kanji Drink (Carrots & Beets)
Peach Chutney (lacto fermented)
Sauerkraut with Ground Dill Seed
❧❧❧❧❧❧❧❧❧❧❧❧❧❧❧❧❧❧❧
Fermented RECIPES BY BALL ®
Easy Brined Fermented Pickles Ball®
❧❧❧❧❧❧❧❧❧❧❧❧❧❧❧❧❧❧❧❧❧❧❧❧❧❧❧
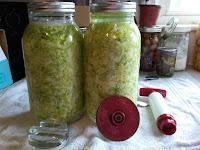
Sauerkraut in Jars
Makes 2 Quarts
Ingredients:
5 lbs of Green Cabbage
3 Tablespoons of pickling salt
(If you'd like Caraway seeds add 1-2 Tbsp to cabbage)
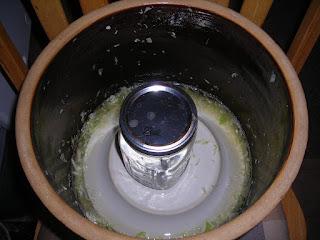
1. Wash and peel the large green leafs off the cabbage. Quarter the cabbage and remove the core. Thinly shred using a mandoline or knife.
2. In a large bowl, mix cabbage and the 3 Tablespoons of salt. Cover with a towel and let stand for 2 hours. With a potato masher or meat pounder, pound the cabbage until it releases enough liquid to coveritself when pressed.
3. Pack the Sauerkraut into a clean 2 Qt canning Jar, tamping down very firmly as you pack. Cover to exclude air. This is where I use the pickle-pro fermenting cap,( if you don't have one you can use the canning jar top and ring)
4. If you are not using the pickle -Pro cap place your jar inside a
bowl to catch the overflow when fermentation begins. Set your jar where the temp will stay between 65-75
5. Check the kraut after 24 hours, It should be completely covered in brine, if not make the Optional Brine by heating the salt and water until the salt is dissolved. Cool to room temp. and pour over the cabbage to the very top of the jar, cover.
6. Check the sauerkraut every few days and remove any scum that appears on the surface, you wont have to do this step if you are using the pickle -pro top.You should see little bubbles rising to the top that means fermentation is taking place. Start tasting it in about 2 weeks.
It will be done in 2-6 weeks. The flavor will change from salty to
pickled. Store in the frig for several months or process in a water bath 20 min for pints or 25 min for Qts.
Optional Brine:(only if the cabbage doesn't start making enough of its own)
Give the kraut a few days to create it's own.
4 Cups Spring Water ( water must be unchlorinated )
1 ½ Tablespoons of Pickling Salt
You can get the gallon set up or buy just the lids for your canning jars
@www.homesteadersupply.com
PS you can also use a pickling crock
❧❧❧❧❧❧❧❧❧❧❧❧❧❧❧❧❧❧❧❧❧❧
Fermented Green Tomatoes Recipe
Pickled the old-fashioned way, through fermentation, these green tomatoes are fermented slowly with hot peppers and garlic for plenty of good flavor.
Fermentation 14 days
Equipment
Quart-sized Jar
Fermentation Seal
Glass Weights
Ingredients
4 cups water
2 tablespoons finely ground real salt
1 1/2 pounds green tomatoes quartered
4 medium hot peppers sliced ¼-inch thick
6 medium garlic cloves
Directions
Warm 2 cups water in a small saucepan, and then whisk in the salt until it dissolves. Turn off the heat, and let cool to room temperature.
Place the tomatoes into a jar, and then add the hot peppers and garlic. Pour the cooled brine over them, adding additional water to cover if necessary. Place a glass fermentation weight over the tomatoes, and seal the jar.
Allow the tomatoes to ferment at least 14 days, and up to 6 weeks. Taste the tomatoes periodically, and when they're sour enough for your liking, transfer them to the fridge where they'll keep at least 6 months.
❧❧❧❧❧❧❧❧❧❧❧❧
Bok Choy Kimchi


❧❧❧❧❧❧❧❧❧❧❧❧❧
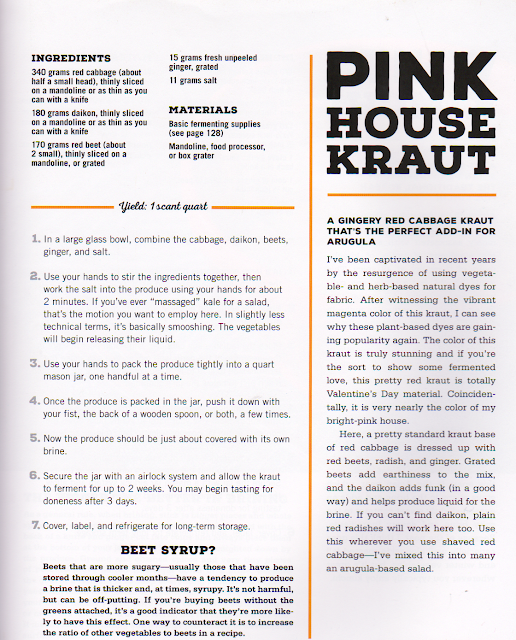
Pink House Kraut

❧❧❧❧❧❧❧❧❧❧
Pink Salt Kraut


❧❧❧❧❧❧❧❧❧❧❧❧❧❧❧❧❧
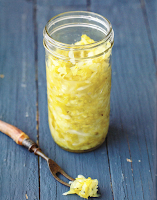
Napa Cabbage Sauerkraut
Makes About: 1 Quart Jar (32 oz | 946 ml)
You will need
1 cup (240 ml) non-chlorinated water, such as spring or filtered
1 Tbsp (15 ml) plus 1 tsp (5 ml) Ball® Salt for Pickling and Preserving
1-2 medium Napa cabbage (about 2 lb or 1 kg), rinsed
To make additional brine: dissolve ½ tsp (2.5 ml) Ball® Salt for Pickling and Preserving in ½ cup (120 ml) non-chlorinated water
Directions
Please read Safety Instructions inside the Fermentation FAQs before beginning.
1. To make brine, dissolve 1 tsp (5 ml) salt in 1 cup (240 ml) water and set aside.
2. Remove any bruised outer leaves of cabbage. Cut cabbage into quarters then remove and discard the core sections. Slice cabbage very thinly and place in a large bowl, then sprinkle with 1 Tbsp (15 ml) salt. Massage salt into cabbage, squeezing to release liquid. Cover bowl and let stand at least 1 hr.
3. Toss cabbage a few more times, squeezing to release any extra liquid. Then pack cabbage into the jar, tamping down firmly with a spoon. Leave at least 2 in. (5 cm) of headspace. Pour any liquid collected in the bowl over the cabbage, pressing down firmly to help liquid cover cabbage. There may not be a lot of natural brine at this time, but the cabbage will continue to release it slowly.
4. Place spring or weight on top of cabbage, then twist lid on.
Wipe jar down and cover with a cloth. Store in a cool (68°F-72°F /20°C-22°C) place for 24-36 hours. If after this time the brine does not cover the cabbage by 1 in. (2.5 cm), remove lid and spring, and add some additional brine to cover.
5. Wipe jar rim before replacing spring and lid. Discard any extra brine.
6. Check daily to make sure vegetables remain submerged in brine. The cabbage will become translucent and slightly yellow in color as it ferments.
7. Let the sauerkraut ferment for 2 weeks, then taste for the mild tangy flavor. If the flavor is to your liking, proceed to step 8. If you prefer a stronger flavor, ferment an additional 1-3 weeks until flavor develops.
8. Once desired flavor is reached remove spring and add additional fresh brine as necessary to cover. Wipe jar rim before replacing lid or use a Ball® canning lid. Store in refrigerator up to 6 months.
❧❧❧❧❧❧❧❧❧❧❧❧❧❧❧❧
Kale, collards, mustard and turnip greens--all these leafy greens are delicious fresh, lightly steamed, or cooked. Because all of these are members of the cabbage family they also make wonderful kraut. But there are a few things to consider:
1) They are much more pungent than cabbage and therefore can produce a strongly-flavored kraut.
2) Different leafy greens have a different texture to them. Collard greens tend to be thicker and tougher, while mustard greens can be lighter. This can cause varying textures and rates of fermentation.
3) A mix of sharper greens like kale and peppery ones like mustard can produce a well-rounded leafy green kraut.
4) Goitrogens are still present in fermented greens so do be sensible about how much leafy green kraut you are consuming if this is a concern for you.
INGREDIENTS:
2 or more bunches shredded leafy greens, enough to fill a quart jar
1-3 Tbsp
3 garlic cloves, peeled and smashed
INSTRUCTIONS:
1) In a large bowl combine greens and salt. Massage the leaves with the salt and let rest 10 minutes so that the juices come out of them.
2) Add half of the greens to a quart jar. Throw in the garlic cloves and pack the rest of the greens tightly on top, pushing them down so that the juices cover them.
3) Cover tightly and ferment 3 days or until they are bubbly and tangy to your liking. Transfer to cold storage. (refrigerate)
❧❧❧❧❧❧❧❧❧❧❧❧
Basic Sauerkraut


❧❧❧❧❧❧❧❧❧❧
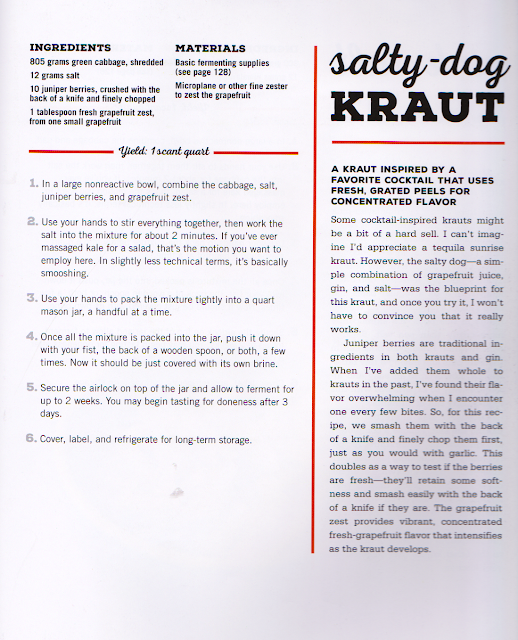
Salty Dog Kraut
❧❧❧❧❧❧❧❧❧❧❧❧
Chow Chow Kraut


❧❧❧❧❧❧❧❧❧❧❧❧❧❧❧❧❧
Chipolte Cauliflower Kraut


❧❧❧❧❧❧❧❧❧❧❧❧❧❧❧❧❧❧❧❧❧❧
Rutabaga & Wakame Sauerruben


❧❧❧❧❧❧❧❧❧❧❧❧❧❧❧❧
Lemony Sprouts Kraut-Chi

❧❧❧❧❧❧❧❧❧❧❧❧❧❧❧❧❧❧
HOT GREEN TOMATO KRAUT
2 lg. heads cabbage
6 medium to large green tomatoes, stems removed
2-4 hot peppers (like jalapeno)
Wash vegetables well, discarding bruised vegetables. Use only just picked fresh vegetables.
Grate cabbage or chop like for slaw. Chop green tomatoes coarsely; chop peppers very fine. Mix all together. Pack into sterilized jars.
To each quart jar add one (1) teaspoon canning salt. If using pints, add 1/2 teaspoon canning salt.
Pour boiling water over the kraut mixture. Loosely tighten lids. The kraut will take about 2-3 weeks to cure or ferment.
Store it in a cool, dark place while the fermentation takes place.
You will notice bubbling in the jars. When the bubbling stops, the kraut is cured.
Tighten the seals and wash off the jars to be stored in a cool, dark place.
Cooks Note: This recipe requires water which has not been treated with calcium carbonate and has not been fluoridated or chlorinated. If in doubt about the quality of your tap water, use a known bottled water or filtered source. Chlorinated water will prevent the formation of lactic acid, which is what preserves the vegetables from spoilage.
Traditional recipes for fermented vegetables do not require processing; these methods have been used for hundreds if not thousands of years.
The USDA recommends processing in a boiling water bath, which will also stops fermentation, so it must be done, if you choose to do so, after the bubbling has stopped.
Use your own discretion in determining whether to process after the fermentation or not.
❧❧❧❧❧❧❧❧❧❧
Kimchi Recipes
❧❧❧❧❧❧❧❧❧❧

❧❧❧❧❧
Kimchi

❧❧❧❧❧❧❧❧❧❧❧
Kumquat Kimchi

❧❧❧❧❧❧❧❧❧❧❧❧❧❧❧❧❧
Lemony Sprouts Kraut-Chi


❧❧❧❧❧❧❧❧❧❧❧❧❧
White Kimchi (Cut)
Prep time: 2 hours
Fermentation time: 5-7 days
Yield: 2 quarts
Ingredients
4 lbs/2 kg (about 1 medium-large head) Chinese (Napa) cabbage
1 lb/ ½ kg Korean radish, daikon or other radish
3 oz./100 grams Asian pear (about 1 small or ½ medium fruit)
1 carrot or small beet root, about 50 grams/2 oz.
30 grams (1/2 cup/125 ml) fresh mushrooms, chopped, any variety
40 g garlic cloves, about 4-6 cloves
30 grams (3-inch/13cm) fresh ginger root
4 green onions
1 Tbsp./15 ml tamari (gluten-free) or regular soy sauce
6 Tbsp./120 grams/90 ml fine sea salt or kosher salt
2 quarts/liters filtered water
Instructions
Soak the Cabbage
Stir salt into water until it dissolves.
Wash and rinse cabbage with fresh water to remove dirt. Remove any outer leaves from the cabbage and set aside. Chop cabbage into 1-inch chunks/strips. Slice the core very thinly. (Some discard the core, but you can slice it and include it).
Peel and cut stems off radish. Cut into ¼"/ 6 mm coins using a mandoline or knife.
Add cabbage and radish pieces to the brine in a large container or mixing bowl. Cover with a something to weigh the veggies down so that the contents submurged under the brine. Put a bowl or plate underneath the container to catch excess overflowing brine.Let soak for 3 to 6 hours, or overnight in the refrigerator.
Drain the veggies through a colander, reserving 1 cup/ 250 ml of the brine.
Make Paste Chop scallions into ½" /13mm slices. Add to work bowl of a food processor or blender.
Peel and roughly chop the garlic and peel and chop the ginger. Add to work bowl.
Roughly chop the carrot and the mushrooms and add to work bowl.
Roughly chop the Asian Pear and add to work bowl.
Add soy sauce to work bowl.
Run food processor until ingredients are all incorporated and a thick paste forms. You can adjust by adding more Tamari/soy sauce or reserved brine to make it smoother.
Pack Jar or Crock
Now the fun part! Wear a latex or plastic glove to protect your hands from getting stinky.
Mix the veggies and paste together thoroughly with your hands, coating each piece.
Pack mixed veggies into the fermenting container.
Secure container with a weight and airlock (follow airlock kit instructions if using).
If not using airlock, add a weight on top of the veggies to keep the contents down underneath the brine. Cover container with a dish towel or tea towel to keep out flies and dust. Secure with a rubber band, twist ties or elastic strap.
Store in a dark place in your kitchen for at least 5 days. When you like the taste and texture, remove any airlock or weights, seal lid tightly and transfer to a refrigerator.
Cabbage kimchi will keep in the refrigerator for up to 3 months. After that, it may lose its crunch, and soften up. It's still perfectly fine to eat, but some people prefer to use old kimchi for cooking.
❧❧❧❧❧❧
Kimchi
1 ½ pounds Chinese cabbage
½ cup salt dissolved in 1 1/2 quarts water
1 ¼ cup sliced scallions
1 ½ tsp each of finely chopped ginger, garlic and dried crushed red pepper flake
1 Tbsp garlic chili paste
1 tsp sugar
Cut cabbage into one inch squares, and place in a mixing bowl with the saltwater. Weight the cabbage down with a plate turned upside down and weight it with a jar full of water. Let stand 3 hours. Drain the cabbage, and rinse two or three times to remove excess salt, draining well again. Stir in remaining ingredients and pack into sterilized jars. Cover and store in a the refrigerator. Kimchi will keep several months that way, it's spiciness and aroma becoming stronger with age.
❧❧❧❧❧❧❧❧❧❧❧❧❧❧❧❧❧❧❧❧❧❧❧❧❧❧❧
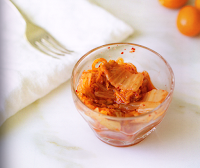
'Snips Chi (parsnips)

❧❧❧❧❧❧❧❧❧❧❧❧❧
Spring Onion Kimchi


❧❧❧❧❧❧❧❧❧
White Kimchi

❧❧❧❧❧❧❧❧❧❧❧❧❧❧❧❧❧❧
Radicchio & Sunchoke Kraut


❧❧❧❧❧
Kimchi
10 lbs of Napa cabbage (4 - 6 heads)
1 C Canning Salt
1/2 C rice flour
1/4 C sugar
3 C water
1 C fish sauce
2 1/2 - 4 C red pepper powder depending how spicy you like it, I use about 3 or so.
1/2 - 1 C julienned carrot, peel first
2 - 3 C julienned Daikon radish, peel first
1 C onion
1 C minced garlic
2 tbs minced ginger
2 bunches green onions
I use gallon jars to store my Kimchi, but if you don't have any, use 8-10 wide-mouth quart jars depending on the size of the cabbage. Being that not all cabbage sizes are equal, you will have to guestimate actual number of jars.
The recipe calls for 10 lbs of cabbage, but I usually buy 4 to 6 heads depending on the size. The cabbage will shrink, but you never quite know how much you'll end up with until you try it.
You really need to use your hands, but please use gloves! It will irritate your skin, not to mention if you rub your eyes, you're in trouble.
Rinse, inspect, and discard the bad leaves on the cabbages.Cut off any brown end at the core, but keep the leaves intact.Quarter the cabbages long ways.
Use the salt to salt each leaf of the quartered cabbages. This will take a while, but is very important. Put a little extra salt on the cores. I just use my hand and sprinkle as I carefully spread open each leaf. Stack the salted quarters in a large basin and let sit for about 6 hours. Turn the quarters over & upside down every hour.
When the cabbage is done salting, rinse thoroughly each leaf of every quarter. Traditionally, this is done about 3 times. You really don't want to taste too much salt on the cabbage, it was merely to draw the moisture out. Squeeze out the water on each quarter and let drain while you prepare the paste.
Use a food processor to chop/blend the onion, garlic, ginger.
Use mandolin to julienne the carrot and radish, pieces should resemble long, very thin matchsticks.
Slice green onions into 1" pieces on the diagonal
PASTE:
In medium sauce pan, add rice flour and water. Over medium heat, bring to boil, stirring often so it doesn't clump and stick to the bottom.
When you see the bubbles pop on the surface, add sugar.Continue stirring for a couple of minutes. Pour into large mixing bowl and let cool.
Add fish sauce, red pepper powder, blended garlic, ginger and onion. Add carrots, radish, green onions.
PUT YOUR GLOVES ON
Stir so that all ingredients are well mixed.
Take one cabbage quarter at a time and literally paint with your hand a bit of the paste on each and every leaf. Apply a little more to the outside and the core. Gently squeeze it back together and place in a jar, flat on the bottom, but keeping the quarter and its leaves as compact as you can.
Add quarters and push them down as you pack each jar. Don't over fill, stop when you get to the jar's shoulders. You don't want big pockets of air in the jars, either. What you are trying to do is make sure every surface of every leaf is covered in the paste to ensure good fermentation. Repeat until all cabbage is seasoned, or you run out of paste. If you have left over paste, you can freeze it.
Seal the jars, but not too tightly, you want the gas to be able to escape. They might also leak some liquid, so line the bottom of your surface with paper towels. Jars need to be left out for at least 2 days at this time of year, since the weather is much colder. Store them in a cool, dark place. Check them after the first day and you should be able to see tiny bubbles inside the jars. You might also see dark liquid collecting at the bottoms of your jars. This is normal. After a day, open one jar and you should smell that familiar, sour kimchee aroma.
Unfortunately, all your jars must be refrigerated after fermenting for a couple of days. This takes up a lot of room and makes the fridge smelly. I have a small fridge I use just for my kimchee.
A lot of people only like to eat 'fresh' kimchee, but cook with the fermented kimchee. If after a while, your kimchee gets too sour, you can use it in spicy soups, stews, or kimchee fried rice.
Napa cabbage is also known as Chinese cabbage.
Radish is Daikon radish, it's white, but shaped like a really long sweet potato. The radish you're supposed to use is a Korean radish, which is sweeter, as fat as a melon, but elongated. Daikon is the closest thing, so I substitute.
Rice powder can be labeled either sweet or not, makes no difference to the recipe.
Fish sauce can be found in the international section of Kroger, don't substitute oyster sauce.
Red pepper flakes aren't the same as red pepper powder, flakes are too big, and won't work the way we need them to.
You can get large jars of minced garlic and ginger in the produce area of Kroger.
With the exception of the rice and red pepper powder, you can get all the ingredients at Kroger.
http://hmart.com also sells the powders with $10 shipping. It's a good site for the basic ingredients. They will also ship some perishable items.
❧❧❧❧❧❧❧❧❧❧❧❧❧❧❧❧❧❧❧❧
Korean Radish or Daikon Kimchi
Peel 4 pounds of Korean radish (or daikon).
Rinse in cold water and pat dry.
Cut it into 1 inch cubes. Put into a large bowl.
Add 2 tbs salt, 2 tbs sugar, and mix well.
Set aside for 30 minutes.
Drain the juice from the radish into a small bowl for later use.
2 tbs minced garlic (about 5-6 cloves garlic),
1 ts minced ginger,
4 stalks of chopped green onions,
¼ cup fish sauce,
2/3 cup hot pepper flakes (use more or less for your taste)
⅓ cup of the juice from the radish.
Mix it up well until the seasonings coat the radish cubes evenly, put the mixture into a glass jar and press down on the top of it to remove any air from between the radish cubes.
Let it ferment by keeping it outside of the refrigerator for a few days. When it starts fermenting, little bubbles may appear, and it’ll smell strong & sour. Then store in the refrigerator.
Radish is Daikon radish, it's white, but shaped like a really long sweet potato. The radish you're supposed to use is a Korean radish, which is sweeter, as fat as a melon, but elongated. Daikon is the closest thing, so I substitute.
❧❧❧❧❧❧❧❧❧❧❧❧❧❧❧
Lacto-Fermented Garlic

❧❧❧❧❧❧❧❧❧❧❧❧❧❧❧❧
Lacto Fermented Peppers

❧❧❧❧❧❧❧❧❧❧❧❧❧❧❧❧❧❧
By Ernest Miller of Rancho La Merced Provisions and a Master Food Preserver
Will make approximately one quart
For the ferment:
4 ounces of carrots, peeled if desired, sliced on the diagonal, about 1/4 inch thick
4 ounces of celery, sliced on the diagonal, about 1/2 inch thick
1 bell pepper, any color or a mix, cut into batons
1 cup of bite-size cauliflower florets
1 clove of garlic, smashed
1/4 of an onion, sliced
1/2 to 1 jalapeños, sliced; remove seeds if desired, and use gloves to protect from the capsaicin
2 bay leaves
a sprig of thyme
Brine:
To make a 5% brine, dissolve 3 tablespoons salt into 1 quart of water.
Or by weight, 1.6 ounces (or 45 grams) of salt per quart of water
Procedure:
1. Layer your vegetables into your fermentation vessel, such as a glass jar or fermentation crock. Pack firmly
without crushing.
2. Add the brine to your fermentation vessel until the vegetable mixture is completely submerged. You may not
need all the brine or you may need more, depending on how you packed the vegetables. If all of the vegetables
do not fit in the jar on the first day, save them in the refrigerator and add them the next day as the original
vegetables will soften and more vegetables will then fit in the jar.
3. Place a clean weight (4 ounce canning jar or ziplock bag filled with brine) in your fermentation vessel to keep
the vegetable mixture submerged.
4. Cover your fermentation vessel with a lid that hasn't been completely sealed (to allow the escape of
fermentation gasses). An airlock is recommended.
5. Store out of direct sunlight at room temperature for a minimum
of four days and up to two weeks while fermentation takes place. The longer the fermentation, the more sour, tangy and tart the fermentation flavors. Check fermentation daily and remove any white film that appears around the top of the jar.
6. Refrigerate and enjoy! Fermented giardiniera should last several months in the refrigerator.
Caution: If your giardiniera becomes soft, slimy, grows mold, or develops a disagreeable odor, discard.
Note: Here is a list of other traditional vegetables you can use in giardiniera:
cucumbers (usually sliced), cornichons (usually whole), fennel, pearl onions, broccoli, romanesco, peppers (all
sorts), runner beans, eggplant, green tomatoes, zucchini (all summer squash), and okra. Remember though, this
is not an exhaustive or exclusive list. Cured green or black olives are also a traditional option for giardiniera,
but I prefer to add my olives afterwards, since they are already fermented/cured.
A number of spices and herbs are also common additions to giardiniera, such as, peppercorns, fennel seed,
mustard seed, celery seed, coriander, red pepper flakes, capers, dill, chervil and oregano.
Leafy greens do not work as well in this format. They are better treated like cabbage as for sauerkraut.
❧❧❧❧❧❧❧
Escabeche by Ball®

❧❧❧❧❧❧❧❧❧❧❧❧❧❧❧❧❧❧❧❧
Fermented Habanero Hot Sauce
(Use Peppers of your choice)

❧❧❧❧❧❧❧❧❧❧❧❧
Fermented Spinach
Ingredients:
1 head spinach
1 Tbsp salt
2 Tbsp liquid whey
Water
Directions:
Add spinach (washed) to mason jars.
Add remaining ingredients over the spinach, and seal tightly with lid. Let sit at room temperature for 3 days before refrigerating.
❧❧❧❧❧❧❧❧❧❧❧❧❧❧❧❧❧❧❧❧❧
How to Make Fermented Pickles
Ingredients
1 half-gallon jar
2 pounds of small cucumbers
3 tablespoons Canning/pickling salt
4 sprigs of fresh dill (or two tablespoons dried dill)½ teaspoon black peppercorns
Instructions
1. Clean and dry the jar and the cucumbers. Rinse the dill and set it aside.
2. Slice the cucumbers to desired thickness. You can slice them so they are round or slice them length-wise so they are long. This is up to you, just make sure they are cut in a length that will fit in your pickling jar.
3. Dissolve the salt in ¼ gallon of water. Stir it until you don't see the crystals anymore to create the brine.
4. Place the dill at the bottom of the jar and add the peppercorns. Pour the cucumber slices on top.
5. Pour the brine solution on top of the cucumbers. Secure the top of the jar with the lid. You can also use a clean cloth then put a fitted plate on top of the jar. Apply some weight to the plate so air doesn't get into the jar and cause mold.
7. Store the jar in a cool, dark place. The fermenting fermenting process will begin immediately and you'll have crispy sour pickles in a matter of days.
The amount of time you need to fully ferment the pickles will be between two and four weeks, depending on the temperature. Keep the pickles for months in the fridge and enjoy them as snacks and sides.
This is how to make fermented pickles, and you can see it's not a difficult process. While the pickles are no longer raw cucumbers, they are in many ways even healthier for you than that raw vegetable form. You're getting beneficial cultures and awesome bacteria which are storming through your digestive tract and keeping your gut health in check.
These fermented pickles can be enjoyed right out of the jar, or you can toss them into salads. However you decide to eat them, you'll be glad you learned how to make your own instead of buying them.
❧❧❧❧❧❧❧❧❧❧❧❧❧❧❧❧❧❧❧
How to Make Fermented Salsa
Tomatoes are, by nature, one of the healthiest foods you can eat. In their fresh, raw form, they are filled with vitamins, minerals and other ingredients packed with anti-oxidants to keep you healthy and fight off long term diseases like cancer and diabetes. Fermenting tomatoes will allow you to harness all that goodness and add some bonus health benefits. When you understand how to make fermented salsa, you get the combined veggies as well as probiotics that are present in fermented foods. The instructions here are for half a gallon of
salsa. You'll find it's one of the tastiest salsas you've ever had, and you can enjoy it on chips, raw veggies or on top of meat, fish, and chicken.
Ingredients
2 or 3 small glass canning jars with lids
2 pounds fresh tomatoes
1 red onion, chopped 1 red bell pepper, chopped
1 green bell pepper, chopped
1 orange bell pepper, chopped
5 garlic cloves, peeled
½ cup whole cilantro leaves
2 limes, juiced
3 tablespoons sea salt
½ teaspoon chili powder (less spicy; use ¼ tsp)
½ cup whey
Directions
1. Chop all the veggies into small pieces and combine in a bowl
Add the garlic and cilantro leaves. Add the lime juice, salt, chili powder and whey. Stir together and allow the mixture to settle for 30 minutes.
2. Clean and dry your containers or jars thoroughly. Everything has to be completely clean so you don't have mold or unhealthy bacteria growing onyour salsa.
3. Spoon the salsa into the jars, close the lids tightly and leave the salsa to ferment at room temperature for three to five days, ideally between 65° - 72°.
4. You may notice the vegetables separate from the liquid, and there will also be bubbles forming at the top of the jars. Open the jars to press the veggies back into the liquid with a clean spoon. This will also allow the gas to escape.
Reseal the lids and continue to ferment.
5. The salsa will be fully fermented after about a week, and if you keep it in your refrigerator, it will be edible for several months.
Once you know how to make fermented salsa, buying the store bought at the grocery store will be impossible. Your fresh ingredients will ferment into something far more delicious, more economical, and easier to enjoy for longer.
You might find it helpful to use a food processor to mince up all the veggies for you, especially if you prefer a less chunky salsa.
❧❧❧❧❧❧❧❧❧❧❧❧❧❧❧❧
Fermented Radish Slices

❧❧❧❧❧❧❧❧❧❧❧❧❧❧❧❧❧❧❧❧❧❧
Brined Green Tomatoes with Basil

❧❧❧❧❧❧❧❧❧❧❧❧❧❧❧❧❧❧❧
Brined Watermelon Radishes


❧❧❧❧❧❧❧❧❧❧❧❧❧❧❧❧❧❧❧❧❧
Chow Chow Kraut Deviled Eggs

❧❧❧❧❧❧❧❧❧❧❧❧❧❧❧❧
Daikon Garlic "Noodles"

❧❧❧❧❧❧❧❧❧
Dilly Beans

❧❧❧❧❧❧❧
Cherry Relish


❧❧❧❧❧❧❧❧❧❧❧❧❧❧❧❧❧❧❧❧❧❧❧❧❧
Fermented Carrot & Daikon Matchsticks


❧❧❧❧❧❧❧❧❧❧❧❧❧❧❧❧❧
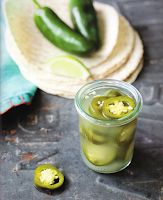
Fermented Jalapeno Slices

❧❧❧❧❧❧❧❧❧❧❧❧❧❧❧❧❧❧❧❧
Fermented Jalapeno Hot Sauce


❧❧❧❧❧❧❧❧❧❧❧
Kohlrabi Spears


❧❧❧❧❧❧❧❧❧
Lime Curtido


❧❧❧❧❧❧❧❧❧❧❧❧❧❧❧❧❧❧
HOT GREEN TOMATO KRAUT
Amount will vary
2 PROCESSES GIVEN ~ FERMENTING OR CANNING
2 lg. heads cabbage
6 medium to large green tomatoes, stems removed2-4 hot peppers (like jalapeno) OPTIONAL
Wash vegetables well, discarding bruised vegetables. Use only just picked fresh vegetables.
Grate cabbage or chop like for slaw. Chop green tomatoes coarsely; chop peppers very fine. Mix all together. Pack into sterilized jars.
To each quart jar add one (1) teaspoon canning salt. If using pints, add 1/2 teaspoon canning salt.
TO CAN:
Pour boiling water over the kraut mixture. Add lids and water bath can according to chart below.

TO FERMENT:
Pour boiling water over the kraut mixture. Loosely tighten lids. The kraut will take about 2-3 weeks to cure or ferment.
Store it in a cool, dark place while the fermentation takes place.
You will notice bubbling in the jars. When the bubbling stops, the kraut is cured.
Tighten the seals and wash off the jars to be stored in a cool, dark place.
Note: This recipe requires water which has not been treated with calcium carbonate and has not been fluoridated or chlorinated. If in doubt about the quality of your tap water, use a known bottled water or filtered source. Chlorinated water will prevent the formation of lactic acid, which is what preserves the vegetables from spoilage.
Traditional recipes for fermented vegetables do not require processing; these methods have been used for hundreds if not thousands of years.
No comments:
Post a Comment
Note: Only a member of this blog may post a comment.