NOTE: All root vegetables MUST be peeled!
This includes the outer layer of onion) and root end removed before using in ANY canned recipe, even when making broths.
All the foods listed below must be pressure canned!
Canning Vegetables and Vegetable Products (NCHFP)
Beans or Peas- Dry
Beans- Green, Wax or Italian
Fresh Lima
Beets
Carrots 🥕
Cream Style Corn -Bernardin®
Corn- Whole Kernel -Bernardin®
Cream Style Corn NCHFP
Corn Whole
Garden Peas
Green Beans
Greens (Beet, Chard, Kale, Mustard, Poke, Spinach & Turnip)
Green Peppers (sweet)
Herbed Peas by Ball®
Hominy
Mirepox
Mixed Vegetables NCHFP
Mushrooms 🍄
Okra
Onions & Garlic 🧅🧄
Parsnips or Turnips
Peas and Carrots w/chives Ball® (see below)
Peas (see below)
Peppers (Hot or Sweet) 🌶
Potatoes 🥔
Snow Peas (see below)
Spinach and other greens
Succotash
Sweet Potatoes 🍠
Sweet Potatoes
Tomatoes W/ Okra or Zucchini
Tomato Wedges and Zucchini
Greens (Leafy greens)
Beet, Swiss Chard, Kale, Mustard, Poke, Spinach & Turnip
Yield: space about 6 PT or 3 quart jars
6 to 18 lb pounds greens
Water
salt (optional)
Prep Wash greens thoroughly under cold running water; drain. Remove large, tough stems.
COOK Put greens and large saucepan. Add just enough water to prevent sticking. Cook greens until wilted, stirring to cook evenly and to prevent sticking. Cut through greens several times using a sharp knife. Bring additional water for canning to a boi in a separate saucepan; reduce heat to a simmer. Keep water hot.
Fill Pack hot greens into a hot jar, leaving 1 inch head space. and a ½ teaspoon salt to Pint jar; 1 tablespoon of salt to a quart jar, if desired. Ladle hot cooking liquid or boiling water over greens leaving 1 inch headspace.
Remove air bubbles.and add more water if needed to 1 inch headspace. Clean jar rim. Center lid on jar and adjust band to fingertip tight. Place jar on the rack in Pressure Canner containing 2 inches (3 quarts) of simmering water (180°) Repeat until all jars are filled.
Process Place Lid on Canner and turn to locked position. Adjust heat to medium-high. Vent a steady stream of steam for 10 minutes. Put weighted gauge on vent; bring pressure to 10 lbs (psi) or what is required for your altitude. Process pint jars for 70 mins or quarts jars for 90 mins. After time is up; Turn of heat; cool canner to 0 pressure.. After 5 minutes, open lid. Let jars cool (in the canner)for an additional 10 minutes. Then remove jarsfrom canner; DO NOT retighten loose rings. Cool on counter for 12 hours. After 12 hours check seals. Label and store jars if sealed.

Carrots

Glazed Carrots

Curried Carrots

Herbed Carrots

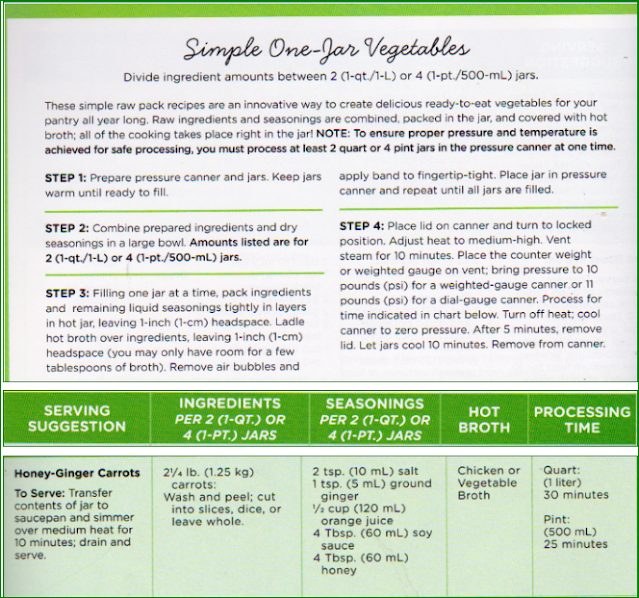
Honey-Ginger Carrots


Canning Potatoes
NOTE: ALL POTATOES MUST BE PEELED BEFORE CANNING

 SAYS...
● If you processed properly, for the required time, yes, the jars are safe.● Numerous causes of siphoning, primarily inconsistent heat/pressure and or prematurely venting the Canner after processing.● The cloudy is starch from the potatoes.● After processing & cooling, the jars need 50% or more liquid for safe shelf stability.● The potatoes exposed above the liquid will most likely discolor in storage but that doesn't affect the safety.Admin
 SAYS...
Tomatoes with Okra or Zucchini

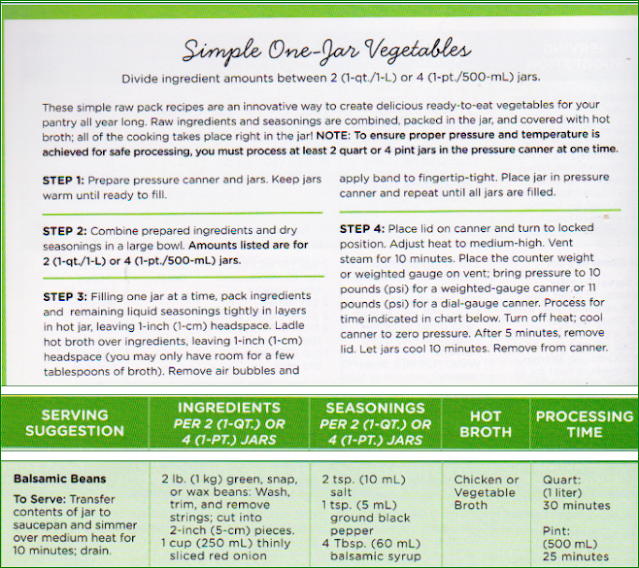
Simple One Jar Vegetables


Roasted Eggplant and Pepper Puttanesca Sauce
Glazed Carrots

Leafy Greens


❧❧❧❧❧❧❧❧❧❧❧❧❧❧❧❧❧❧❧❧❧❧❧❧❧❧❧
RutabagaRutabaga can be pressure canned using the same canning directions as per turnip. Here we walk through the directions provided by So Easy To Preserve (which are the same as those provided by Ball and Bernardin.)
Ingredients
Rutabaga
water (boiling)
salt (optional)
Instructions
Wash rutabaga, then peel.
Cut into cubes or chunks 1 to 2 inches.
Blanch the cubes in boiling water for 3 to 5 minutes.
Pack into jars leaving (1 inch) headspace.
Top up with fresh boiling water leaving 3 cm (1 inch) headspace.
Season jar with a teaspoon or half-teaspoon of salt if desired.
Put lids on, put in pressure canner.
Processing pressure: 10 lbs weighted gauge, 11 lbs dial gauge, adjust pressure for your altitude when over 1000 feet.
Processing time: Pints for 30 minutes. OR Quarts for 35 minutes
Recipe Notes
The reason for washing the rutabaga before peeling is to reduce the bacterial level so that you don't drive bacteria into the flesh of the rutabaga while peeling.
After peeling the rutabaga, put two pots of water on: one to blanch the rutabaga in, and one to use for bottling water. You can of course boil the canning water in a kettle, instead.


No comments:
Post a Comment
Note: Only a member of this blog may post a comment.